Thursday, December 23, 2010

Tondlichi Bhaji (Ivy Gourd Bhaji)

Ivy gourd/tondli/tindora is from the cucumber family. Some preparations need them cut into small rounds and some need them slit long and thin. It is weird...but personally I think they taste different both ways. My mind does not want to accept this, but my tastebuds seem to have a different story to tell everytime! :)

Tondlichi bhaji is one of Alok's favorite vegetable preparations. I, on the other hand, am not a big fan.
Alok prefers to take lunch from home to his office. Good for health and of course on the pocket!
I like making tondli this way because it is so very simple and quick that it is absolutely ideal whenever I need this ready by 7 in the morning.
Perfect low brain activity so early in the morning!

Serves: 2 to 3 people
Level: Easy


Ingredients:
500 gms ivy gourd/tondli, cut into thin rounds
1 large onion, roughly chopped
3/4 tsp mustard seeds
2 pinch asafoetida
1/2 tsp turmeric powder
3/4 tsp red chilly powder
1/2 tsp sugar
1/2 tsp cumin powder (optional)
1/2 tsp coriander powder (optional)
1 tsp garam masala
Salt to taste

Method:
Step 1 - In a pot, heat 2.5 tblsp oil. When the oil is hot, add in mustard seeds and let them splutter. Add in the asafoetida and turmeric powder. Saute for a few seconds and add the onions. Saute for 5 to 6 mins on a medium high flame till the onions get light brown.

Step 2 - Add in the chopped tondli/ivy gourd. Mix everything well and cook covered for 5 to 10 mins stirring occasionally. When it is cooked half way through add the red chilly powder, salt, cumin powder and coriander powder. Mix well and cook till the veggies are cooked.

Step 3 - Just before everything is done, sprinkle in the garam masala and mix well. Cook covered for another minute and we are done.

Serve hot with some chapatis.

Tips:
You can jazz up the same dish in different ways by changing the final masala. I have replaced garam masala with tandoori masala, meat masala and even malwani masala. Use your own imagination!

Tuesday, December 21, 2010

Palmiers

Puff Pastry + Sugar ...DONE! Now, who would not enjoy this dazzling instant cookie.

'Palmiers' or 'Elephant ears' are classic French cookies. These look quite similar to the Little Hearts that we get in India. But dont let the word "French" threaten you! These cookies are almost effortless!

Palmiers can be best described as light as air, flaky, buttery, caramelly....Do you need any more convincing to get on to making these?? 

Due to its simplicity, Palmiers go great with any desserts. They are a great tea time snack when you are entertaining guests or even a great quick after dinner snack!

Here's how they are made!

Level: Easy
Serves: 15-16 medium cookies 


Ingredients:
1 puff pastry sheet, thawed as per package instructions
0.5 cup sugar
1.5 tblsp butter, melted (optional)

Method:
Step 1 - On a large surface (I used my large cookie sheet), sprinkle slightly less than half of the sugar. Try and spread it as even as possible. Place the thawed puff pastry sheet on this and lightly roll it. This makes sure the sugar sticks to bottom of the pastry sheet. The rolling will also expand the puff pastry sheet a little more. 

Step 2 - Now, sprinkle the remaining sugar over the puff pastry, leaving behind about 2 tblsp of sugar and spread it evenly. Lightly try and press the sugar in the sheet. Roll your rolling pin over this if you want. 

Step 3 - Now the folding begins. Firstly, turn the pan in such a way, that you see a vertical rectangle in front of you. This will ensure maximum cookies. Remembering that both the sides need to meet in the center, start folding the sheet and pressing it in place as you fold. Fold both the sides 1/4 inch at a time and let them meet in the center, where they touch each other. Then fold one side over the other and gently press them together. Wrap this roll in a foil or plastic wrap tightly and place in the refrigerator for 45 mins.

Step 4 - Preheat the oven to 400 deg. F. Take the roll of puff pastry sheet out of the refrigerator and cut into 1/2 inch thick pieces. Place them on a parchment lined baking sheet 2 inches apart from each other. Lightly  pinch the bottom of every cookie with your fingers. This will ensure that they do not unfold while baking. Lightly brush them with melted butter (if you plan to use any) and sprinkle these with the remaining sugar. Place it in the center rack of the oven for 15 mins until they turn light brown. Then flip them over and let them cook for 5 more mins.

Serve at room temparature. Dont get over-excited and pop one right out of the oven, even if you are immensely tempted. Bubling melted sugar in your mouth is never going to be a pleasant experience!


Tips:
1/2 cup sugar is almost a minimum quantity for this recipe. Don't try and reduce it. It looks a whole lot when you are spreading it around, but once these puff pastries increase in size while baking, it does not end up overly sweet.

Keep an eye on the cookies every 5 mins in the oven as every oven is different. You dont want them to burn.

The recipe above is the basic palmier recipe. 
You can use vanilla sugar to get a different flavor. 
You can use cinnamon or nutmeg sprinkling along with the sugar for a different kick! 
You can also make these savory. Replace sugar with some parmesan cheese, sun dried tomatoes, pesto...anything. Go creative!

Happy Cooking Everyone!

Submitting this recipe to the Bake Fest held by Sumee's Culinary Bites who is hosting the Fest on Vardhini's behalf.

Friday, December 17, 2010

Peeth Perun Simla-mirchichi Bhaji (Bell Peppers Bhaji)

Simple Indian Bhajis (dry preparations) are always welcomed with a smile at my home! My husband and I are not major eating out fans! Well, we do enjoy eating out, but mostly it is because it gives me a break from cooking! I notice I always end up saying homely things right after a major party! Lets not get into awkward details here..

Bell peppers or capsicums are one of the most easy to find vegetables anywhere in the world. So it shouldnt be a big task to put this preparation together. And a simple recipe always makes life easier. So here is one such quick yet not too basic recipe for all of you out there.

"Peeth-Perun" refers to a preparation that involves addition of chickpea flour/besan, which is the "peeth" here. 

Serves: 3 to 4 people
Level: Easy


Ingredients:
1 large onion, roughly chopped
4 large bell peppers, roughly chopped (I use green)
1 cup chickpea flour
1 tsp mustard seeds
2 pinch asafoetida (hing)
0.5 tsp sugar
1/2 tsp turmeric powder
3/4 tsp black pepper powder
3/4 tsp cumin powder
1/2 tsp red chilly powder
Salt to taste

Method:
Step 1 - In a pan, preferably flat, heat 3 tblsp oil. When the oil is hot, add the mustard seeds and let them splutter. Add the asafoetida and turmeric powder. Saute for a few seconds. Add onions and saute on a medium high flame till the onions start turning brown.

Step 2 - Add the bell peppers and mix well. Cover with a lid for 5 - 6 mins stirring occasionally till the bell peppers are no longer totally raw. Add the salt, black pepper powder, cumin powder, red chilly powder and sugar. Mix well and cook covered till the bell peppers are almost done. We do not want the bell peppers to break down and mash. You should just be able to break them apart with your spoon effortlessly. Adjust taste. At this stage the whole preparation should be slightly stronger than what you desire. This is because, we are now going to add all the chickpea flour.

Step 3 - Lower the heat. Add the chickpea flour spoon by spoon and keep mixing, trying to avoid any lumps from being formed. Once all the chickpea flour is added, cover with a lid and let this cook for 2 to 3 mins, so the flour is no longer raw. 

Step 4 - This is an optional step. You can gently press all the preparation to the bottom of the pan and cook it for 5 more mins. on a low flame uncovered. This will give a slightly burnt texture to the vegetable, which according to me, makes it even more tasty.

Serve hot with some chapatis. It tastes great with some plain yogurt too. Hell I use it as a sandwich filling too. 

Did I mention this was one of my favorites??! :)

Tips:
In step 3, to be sure of avoiding lumps, you can sift the flour into the vegetable. But thats not compulsory. Personally I dont mind little lumps in this preparation. They taste really cool.

Once, you are done making this dish, make sure you dont cover it. Let it cool down completely and then cover this up. Covering this vegetable when it is hot or warm, makes it all soggy by the time it is ready to be eaten. And that is not a pleasant sight!

Thursday, December 16, 2010

Ambadichi Amti (Gongura curry)

Tired of the same spinach and fenugreek preparations, I wanted to start adding some different greens in our diet. That is when I came across a nameless maple leaf like green leafy vegetable in our grocery store.
But the problem was that I dint know what it was!
After a lot of high level discussions between my husband and me and trying to figure out on the iphone what this was..we finally decided to ask the owner about this vegetable.
He said.."Ye Gongura Hai!". Now that dint help us at all, as we dint ever hear of GONGURA*!
So we surfed online again and realised that this was called Ambadi in marathi. I was shocked! It was one of my absolute favorite greens and I dint know it looked anything like this before cooking!
I picked up a huge bunch and we headed home.

The story doesnt end here. I still had to be sure before I started wasting time and ingredients on this preparation.
So now it was skype time!
I asked my mom to log onto skype and made sure I had the correct vegetable in my hand. Once that was confirmed, I moved on to finally cooking this green.

What would I do without technology! :)

Serves: 3 to 4 people
Level: Easy


Ingredients:
1 large bunch gongura leaves (ambadi), roughly chopped
1/2 cup raw peanuts
1/2 cup chana dal
3/4 tsp mustard seeds
Pinch of asafoetida
6-8 fenugreek seeds (methi seeds)
1/2 tsp turmeric powder
3 green chillies, finely chopped
1 tblsp chickpea flour (besan)
1 tblsp goda masala
1 tblsp jaggery
Salt to taste
Oil

Method:
Step 1 - In a small bowl, add the peanuts and chana dal and soak them completely in water for a minimum of 3 to 4 hrs. Overnight would be better. Pressure cook these for 2 whistles till they are cooked well. We do not want to mash them. 

Step 2 - In a large pot, heat 3 tblsp of oil. When the oil is hot, add the mustard seeds. Once they splutter, add the asafoetida, fenugreek seeds and green chillies. Saute for a few seconds. Add turmeric powder. Saute for a few more seconds and add the chopped gongura leaves. Cook this for a good 5 mins mixing continuously.

Step 3 - Once all the greens wilt and start oozing water, add the chickpea flour and mix well. Add the salt, boiled peanuts and chana dal from Step 1, goda masala and jaggery. Mix well. Add enough water to reach your desired consistency. Mix well and let this boil for 5 to 10 mins. uncovered.

Serve hot with hot chapatis or/and rice.

Tips:
You can use this same preparation method with colocasia leaves too. It would result in a really famous maharashtrian preparation called "Alu cha phatphata". You will come across this if you get a chance to attend a traditional maharashtrian wedding. Just make sure you remember one change. Unlike gongura leaves, colocasia leaves are not sour. So just add 1/2 to 3/4 tsp of tamarind concentrate to the recipe above.

*Gongura leaves: 
Source: http://www.natural-homeremedies.com/blog/health-benefits-of-red-sorrel-leaves/
Gongura leaves are also known as Red Sorrel, Ambadi and Pulicha Keerai in various parts of India. It comes in two varieties namely the green leaf and the red variety, the latter being more sour than the former. The leaves are bitter, mildly astringent and have an acidic taste.
The herbal leaves of gongura, have the health benefit of being very effective in relieving the symptoms of fever.  It helps to cool any inflammation and heat in the blood. Fresh leaves help to stimulate the stomach and to sharpen the appetite.  In addition it is the herb that helps to cool the liver.


Thursday, December 2, 2010

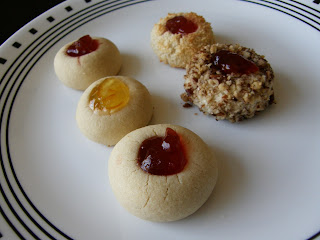
Jam Drop Cookies

Tiny Beauties!

These tiny cookies, immediately impressed me. They looked so adorable that I had to try some right away. Making these are a total breeze! 

These cookies are also called Thumbprint Cookies. And that is because when you place them on a baking tray, you press your thumb in the center to make depressions, which are later filled with jam or jelly. The texture is more like the Indian Nankhatai or Shortbread cookies, but these arn't as sweet. The jam gives it the perfect sweetness. 

I made these cookies plump, because they look cuter! But you can make them slightly flat and then make a depression in them. Generally these cookies are baked with the jam IN them. But if you do this, make sure you finish these in a couple of days as the jam will slowly get the cookie soft, if not soggy. 
I bake jam drop cookies without any filling. I plop some jam just before serving and that according to me is perfect!

Heres how you make these. 

Serves: 16 cookies
Level: Easy


Ingredients:
1/2 cup unsalted butter, at room temperature
1/4 cup sugar
1 large egg, separated
1/2 tsp vanilla essence
1 cup plain flour
1/8 tsp salt
Jam for filling, any flavor
Crushed nuts to coat, optional
Crushed/Flaky coconut to coat, sweetened or plain, optional

Method:
Step 1 - Preheat oven at 350 Deg. F. Place some parchment paper on your baking sheet. If you don't have any on hand, spray some cooking oil on the tray.

Step 2 - Mix the flour and salt together. Keep aside.

Step 3 - In a large bowl, beat the butter and sugar till it forms a smooth paste. Preferably with an electric whisk. Add the egg yolk and vanilla essence. Beat well again till it all comes together. 

Step 4 - Slowly sift in the flour mixture from step 2. Keep beating till it starts to form a crumb-like mixture. Do not panic! Once the mixture resembles soft bread crumbs. Put the electric whisk away and knead the dough together with your hands. It should easily come together. Try rolling the dough into small rounds and place these on the lined baking tray from step 1.

Step 5 - To make coated jam drops, spread the nuts/coconut on a flat plate. Dip the cookies in egg white and immediately roll them into the nuts/coconut. Place them on the lined baking tray.

Step 6 - Press your thumb or the back of your wooden spoon into the cookie dough on the tray and form a deep depression or indentation. You don't want to go all the way through! We just need to make depressions for the jam to be poured in.

Step 7 - Bake in the preheated oven for 12-13 mins, or until the base of the cookie starts to brown. In case of the coated jam drop cookies, bake till the coconut/nuts start to brown. Make sure you don't burn these. Once done, turn the cookies onto a cooling rack and let them cool down. 

Pour in your favorite jam and serve!


Tips:
If in step 4, you find the dough too soft to roll into rounds, keep it in the refrigerator for 30 mins till the dough can be handled well.

For fillings, you can use any flavored jam. These cookies would taste good with nutella or peanut butter in them too. Get creative here!

Do not worry if you see the cookies form cracks in the oven. Trust me, they wont break and neither are these cookies too brittle to be served.

Happy Cooking Everyone!