I was first introduced to 'Hummus' by my brother in London. But back then, I did not know that there exists a variety of hummus flavors!
I was introduced to the world of hummus with different flavors only when I started visiting the farmers market here in california. I was absolutely amazed by the choices available. But being true to its farmers market trend, these were quite costly and we couldnt just keep buying them every week. Also, being absolutely tasty, these were gone almost always before we even reached home!
This is where I started looking up for hummus recipes everywhere. I realized that making home-made hummus is not a big deal after-all! All I had to do was go in search of a bottle of 'Tahini'. Indian stores everywhere carry one. If yours doesn't, head on to a store which sells middle-eastern food.
So without any hurdles, I decided to try making this dip for our upcoming party. And what a hit it was!
I was so thrilled with the final outcome, that I immediately started on the second batch and popped it in the freezer. I was just too sure we would need it soon!
I have decided to try most of my favorite hummus recipes one by one. Cilantro Jalapeno Hummus was on the top priority list. This will be soon followed by Eggplant Hummus, Garlic Hummus, Roasted Red Pepper Hummus, Chipotle Hummus...well the list goes on!
Here is how it is made.
Level: Easy
Serves: 2 soup bowls full
Ingredients:
3/4 cup coriander leaves/cilantro, roughly chopped
3 jalapenos, roughly chopped
2 cloves garlic
1.5 tblsp lime juice, freshly squeezed
1.5 tblsp water
4 tblsp tahini
2 tblsp olive oil (I used extra virgin)
1 can garbanzo beans/chickpeas, drained and washed
1/2 tsp cumin powder
1/2 tsp red chilly powder
Salt as per taste
Method:
Step 1 - In a small bowl, mix together the lemon juice and water. Keep aside.
Step 2 - In another bowl, mix together the tahini and olive oil. Keep aside.
Step 3 - In a food processor bowl, with the chopping attachment on, add the cilantro, jalapeno and garlic. Run the processor for a few seconds. Open it and push all the ingredients sticking to the sides, back in the center and pulse till they all are finely minced.
Step 4 - Add the garbanzo beans, 1/4 tsp salt, cumin powder and red chilly powder. Process again till everything combines well. This shouldnt take more than a minute. If you think the mixture is sticking to the sides of the bowl, open the processor and push everything down. You will have a nice green grainy mixture here.
Step 5 - With the processor running, pour in the lemon juice and water from step 1. Then pour in the tahini and olive oil from step 2 through the shute, in a steady stream. This will start making the hummus creamy. At this point if you think you would like the hummus to be more creamy, you can add in some more tahini. But tahini not being too heart friendly, I just add in some water, 1 tblsp at a time. You might have to stop processing and start scraping the sides of the bowl occasionally.
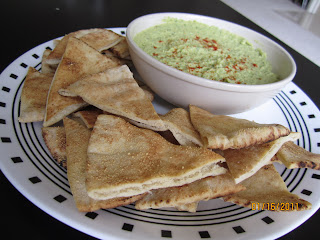
The end result would be a creamy light green, perfect hummus!
Serve with some toasted/fried/soft pita chips.
I served it with some homemade
toasted garlic pita chips.
If you are serving this as a dip, smear it in a flattish bowl or a plate. Even out the top with the back of your spoon. Pour a little bit of olive oil over it, sprinkle some red chilly powder and throw a few coriander leaves on the top, just before serving. Makes a great presentation.
You can use it as a sandwich spread too.
You can use it for dipping your falafels in...
....The possibilities are endless!
Tips:
If you do not own a food processor, dont lose hope. Many recipes suggest doing this in a blender. Though I have not personally tried making this in a blender, I dont think it should be a problem, as finally we want a creamy, non-chunky hummus.
You will have to use canned garbanzo beans for this recipe. DO NOT use home boiled chickpeas. They just dont work. Unfortunately, I learnt this the hard way! Waste of ingredients...and efforts!
You can adjust the taste of hummus as per your liking. The recipe I made, makes a medium spicy hummus. So you can take it from there. Generally hummus requires a little more lemon juice, so you can work that in too. But I am not a big fan of tangy hummus.
The picture above, shows a double batch of hummus ingredients.
What's hummus?
Hummus is a middle-eastern dip that is made from chickpeas. In fact, hummus is the Arabic word for chickpea. It is mainly made of chickpeas and tahini, a paste similar in texture to peanut butter, but it is made of sesame seeds.
Because both chickpeas and sesame seeds are very healthy, hummus is a nutritionist's delight.
Chickpeas are a good source of protein, postassium and fiber. Sesame seeds are a good source of protein and vitamin E. It is also a great anti-oxidant.
So go ahead and indulge!