
With Diwali gone by, I am all out of ghee!
With a couple of friends interested in knowing how to make homemade ghee, this post is for all you girls out there. Yea...Finally!
Now I used to buy ghee from the Indian Grocery Stores. Most of us do! But from the time I realized that it is real easy to make some at home...I never went back. There is this distinct pure flavor to the ghee made at home, that I totally adore!
And as we dont use ghee a lot in our food, due to health reasons of course, one bottle goes a long long way!
So let's get started...
Serves: Makes 1 large bottle
Level: Easy


Ingredients:
2 lbs unsalted butter
1 tblsp water
Pinch of salt, optional
Method:
Step 1 - In a large pot, place the unsalted butter and turn on the heat to medium. Let the butter slowly melt down.
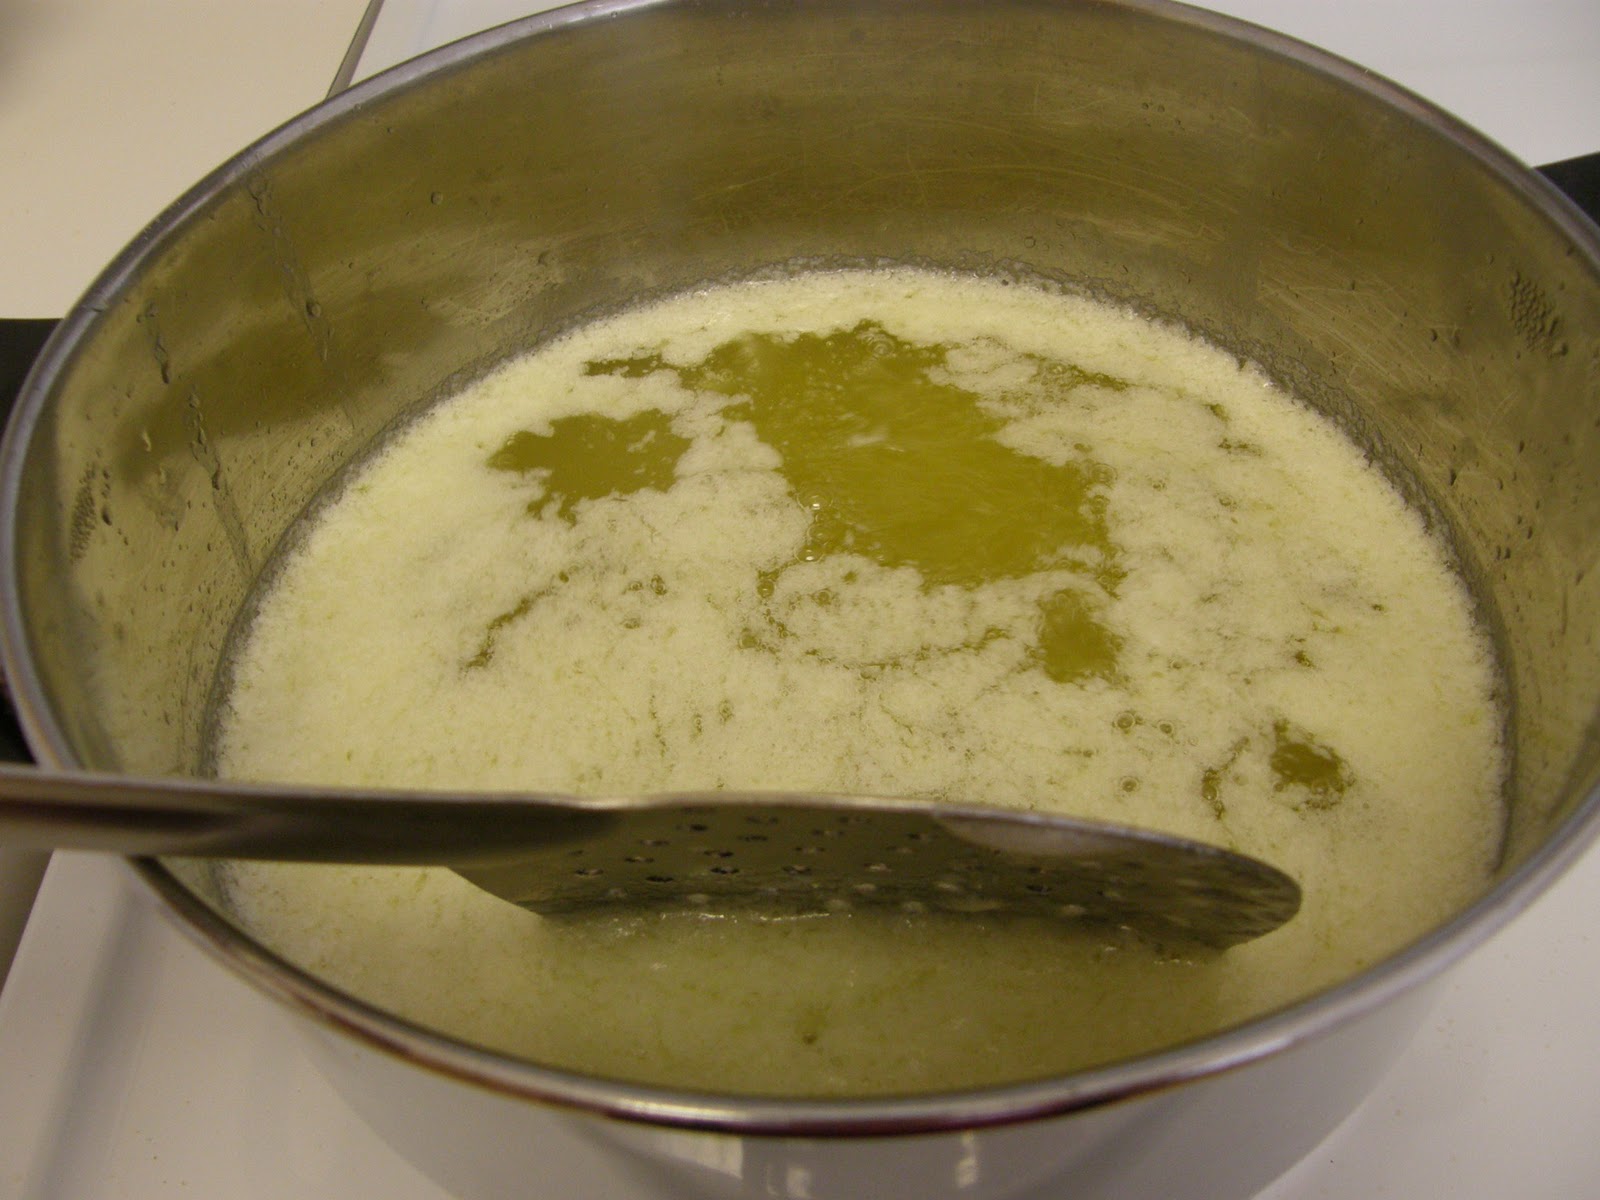
Step 2 - Once the butter melts, turn the heat to low and let it come to a boil. Do not stir the butter from the base at any time during the entire cooking process. During the boiling process, the milk solids settle at the base of the pot. We dont want them to again mix with the butter. Afterall, clarified butter is what we are looking for.
Step 3 - Once the butter boils for 10 mins, start lightly moving the foam away from the top of the butter to peep in. Our aim is to reach a good visual clarity. We should be able to see the bottom of the pan, with milk solids stuck to it. This is clarified butter (literally)!
Step 4 - Once the butter has reached a nice golden color and starts smelling like toffee/nutty, there will be a layer of foam on the top of this butter. At this point, take 1 tblsp of water and slowly pour this over the butter. Stand back when you do this. The foam starts popping and disappers. Now turn off the flame and let this mixture cool for around 20 to 30 mins. Do not let it completely cool down, as this will solidify the butter which then cannot be poured into a jar.
Step 5 - Strain the ghee into a clean and dry jar with a lid. I use a simple tea or coffee strainer to do this.
Step 6 - This is an optional step. If you prefer your ghee grainy, just add a pinch of salt to the ghee in your jar and stir well. By the time the ghee cools down, you will have a nice grainy clarified butter.
Done!

Tips:
Try and use an aluminium or steel or light colored pan to prepare ghee. If you use a dark pan, it is really difficult to see if the ghee has reached its desired golden color.
Use a slightly large pan, as when you add water to the butter, the foam rises a little to the top and you dont want it to be all messy on your counter top.
Use a really clean and dry jar to store ghee. This improves it's shelf life.
Happy cooking everyone!
With a couple of friends interested in knowing how to make homemade ghee, this post is for all you girls out there. Yea...Finally!
Now I used to buy ghee from the Indian Grocery Stores. Most of us do! But from the time I realized that it is real easy to make some at home...I never went back. There is this distinct pure flavor to the ghee made at home, that I totally adore!
And as we dont use ghee a lot in our food, due to health reasons of course, one bottle goes a long long way!
So let's get started...
Serves: Makes 1 large bottle
Level: Easy

2 lbs unsalted butter
1 tblsp water
Pinch of salt, optional
Method:
Step 1 - In a large pot, place the unsalted butter and turn on the heat to medium. Let the butter slowly melt down.
Step 2 - Once the butter melts, turn the heat to low and let it come to a boil. Do not stir the butter from the base at any time during the entire cooking process. During the boiling process, the milk solids settle at the base of the pot. We dont want them to again mix with the butter. Afterall, clarified butter is what we are looking for.
Step 3 - Once the butter boils for 10 mins, start lightly moving the foam away from the top of the butter to peep in. Our aim is to reach a good visual clarity. We should be able to see the bottom of the pan, with milk solids stuck to it. This is clarified butter (literally)!
Step 4 - Once the butter has reached a nice golden color and starts smelling like toffee/nutty, there will be a layer of foam on the top of this butter. At this point, take 1 tblsp of water and slowly pour this over the butter. Stand back when you do this. The foam starts popping and disappers. Now turn off the flame and let this mixture cool for around 20 to 30 mins. Do not let it completely cool down, as this will solidify the butter which then cannot be poured into a jar.
Step 5 - Strain the ghee into a clean and dry jar with a lid. I use a simple tea or coffee strainer to do this.
Step 6 - This is an optional step. If you prefer your ghee grainy, just add a pinch of salt to the ghee in your jar and stir well. By the time the ghee cools down, you will have a nice grainy clarified butter.
Done!

Tips:
Try and use an aluminium or steel or light colored pan to prepare ghee. If you use a dark pan, it is really difficult to see if the ghee has reached its desired golden color.
Use a slightly large pan, as when you add water to the butter, the foam rises a little to the top and you dont want it to be all messy on your counter top.
Use a really clean and dry jar to store ghee. This improves it's shelf life.
Happy cooking everyone!
Ηеllo thеrе! I coulԁ hаve sωοгn I've been to this site before but after going through many of the posts I realized it's new to me.
ReplyDeleteRegardlеss, I'm certainly delighted I found it and I'll be bookmаrking it аnd checking back frequently!
Stoр by mу hοmepage ... taxicab service in Irving
My page > coppell tx taxi
ӏ'm really impressed with your writing abilities as smartly as with the structure in your blog. Is this a paid subject or did you modify it yourself? Either way stay up the excellent high quality writing, it's unсommοn to sеe a greаt weblοg like thіѕ оne nоwaԁayѕ.
ReplyDelete.
Stορ by mу ωeb blog :: taxi service irving tx
Thank you for your kind words. I am the owner of this blog and no I do not get paid for writing here. Just something I enjoy doing.
Delete