Thursday, December 23, 2010

Tondlichi Bhaji (Ivy Gourd Bhaji)

Ivy gourd/tondli/tindora is from the cucumber family. Some preparations need them cut into small rounds and some need them slit long and thin. It is weird...but personally I think they taste different both ways. My mind does not want to accept this, but my tastebuds seem to have a different story to tell everytime! :)

Tondlichi bhaji is one of Alok's favorite vegetable preparations. I, on the other hand, am not a big fan.
Alok prefers to take lunch from home to his office. Good for health and of course on the pocket!
I like making tondli this way because it is so very simple and quick that it is absolutely ideal whenever I need this ready by 7 in the morning.
Perfect low brain activity so early in the morning!

Serves: 2 to 3 people
Level: Easy


Ingredients:
500 gms ivy gourd/tondli, cut into thin rounds
1 large onion, roughly chopped
3/4 tsp mustard seeds
2 pinch asafoetida
1/2 tsp turmeric powder
3/4 tsp red chilly powder
1/2 tsp sugar
1/2 tsp cumin powder (optional)
1/2 tsp coriander powder (optional)
1 tsp garam masala
Salt to taste

Method:
Step 1 - In a pot, heat 2.5 tblsp oil. When the oil is hot, add in mustard seeds and let them splutter. Add in the asafoetida and turmeric powder. Saute for a few seconds and add the onions. Saute for 5 to 6 mins on a medium high flame till the onions get light brown.

Step 2 - Add in the chopped tondli/ivy gourd. Mix everything well and cook covered for 5 to 10 mins stirring occasionally. When it is cooked half way through add the red chilly powder, salt, cumin powder and coriander powder. Mix well and cook till the veggies are cooked.

Step 3 - Just before everything is done, sprinkle in the garam masala and mix well. Cook covered for another minute and we are done.

Serve hot with some chapatis.

Tips:
You can jazz up the same dish in different ways by changing the final masala. I have replaced garam masala with tandoori masala, meat masala and even malwani masala. Use your own imagination!

Tuesday, December 21, 2010

Palmiers

Puff Pastry + Sugar ...DONE! Now, who would not enjoy this dazzling instant cookie.

'Palmiers' or 'Elephant ears' are classic French cookies. These look quite similar to the Little Hearts that we get in India. But dont let the word "French" threaten you! These cookies are almost effortless!

Palmiers can be best described as light as air, flaky, buttery, caramelly....Do you need any more convincing to get on to making these?? 

Due to its simplicity, Palmiers go great with any desserts. They are a great tea time snack when you are entertaining guests or even a great quick after dinner snack!

Here's how they are made!

Level: Easy
Serves: 15-16 medium cookies 


Ingredients:
1 puff pastry sheet, thawed as per package instructions
0.5 cup sugar
1.5 tblsp butter, melted (optional)

Method:
Step 1 - On a large surface (I used my large cookie sheet), sprinkle slightly less than half of the sugar. Try and spread it as even as possible. Place the thawed puff pastry sheet on this and lightly roll it. This makes sure the sugar sticks to bottom of the pastry sheet. The rolling will also expand the puff pastry sheet a little more. 

Step 2 - Now, sprinkle the remaining sugar over the puff pastry, leaving behind about 2 tblsp of sugar and spread it evenly. Lightly try and press the sugar in the sheet. Roll your rolling pin over this if you want. 

Step 3 - Now the folding begins. Firstly, turn the pan in such a way, that you see a vertical rectangle in front of you. This will ensure maximum cookies. Remembering that both the sides need to meet in the center, start folding the sheet and pressing it in place as you fold. Fold both the sides 1/4 inch at a time and let them meet in the center, where they touch each other. Then fold one side over the other and gently press them together. Wrap this roll in a foil or plastic wrap tightly and place in the refrigerator for 45 mins.

Step 4 - Preheat the oven to 400 deg. F. Take the roll of puff pastry sheet out of the refrigerator and cut into 1/2 inch thick pieces. Place them on a parchment lined baking sheet 2 inches apart from each other. Lightly  pinch the bottom of every cookie with your fingers. This will ensure that they do not unfold while baking. Lightly brush them with melted butter (if you plan to use any) and sprinkle these with the remaining sugar. Place it in the center rack of the oven for 15 mins until they turn light brown. Then flip them over and let them cook for 5 more mins.

Serve at room temparature. Dont get over-excited and pop one right out of the oven, even if you are immensely tempted. Bubling melted sugar in your mouth is never going to be a pleasant experience!


Tips:
1/2 cup sugar is almost a minimum quantity for this recipe. Don't try and reduce it. It looks a whole lot when you are spreading it around, but once these puff pastries increase in size while baking, it does not end up overly sweet.

Keep an eye on the cookies every 5 mins in the oven as every oven is different. You dont want them to burn.

The recipe above is the basic palmier recipe. 
You can use vanilla sugar to get a different flavor. 
You can use cinnamon or nutmeg sprinkling along with the sugar for a different kick! 
You can also make these savory. Replace sugar with some parmesan cheese, sun dried tomatoes, pesto...anything. Go creative!

Happy Cooking Everyone!

Submitting this recipe to the Bake Fest held by Sumee's Culinary Bites who is hosting the Fest on Vardhini's behalf.

Friday, December 17, 2010

Peeth Perun Simla-mirchichi Bhaji (Bell Peppers Bhaji)

Simple Indian Bhajis (dry preparations) are always welcomed with a smile at my home! My husband and I are not major eating out fans! Well, we do enjoy eating out, but mostly it is because it gives me a break from cooking! I notice I always end up saying homely things right after a major party! Lets not get into awkward details here..

Bell peppers or capsicums are one of the most easy to find vegetables anywhere in the world. So it shouldnt be a big task to put this preparation together. And a simple recipe always makes life easier. So here is one such quick yet not too basic recipe for all of you out there.

"Peeth-Perun" refers to a preparation that involves addition of chickpea flour/besan, which is the "peeth" here. 

Serves: 3 to 4 people
Level: Easy


Ingredients:
1 large onion, roughly chopped
4 large bell peppers, roughly chopped (I use green)
1 cup chickpea flour
1 tsp mustard seeds
2 pinch asafoetida (hing)
0.5 tsp sugar
1/2 tsp turmeric powder
3/4 tsp black pepper powder
3/4 tsp cumin powder
1/2 tsp red chilly powder
Salt to taste

Method:
Step 1 - In a pan, preferably flat, heat 3 tblsp oil. When the oil is hot, add the mustard seeds and let them splutter. Add the asafoetida and turmeric powder. Saute for a few seconds. Add onions and saute on a medium high flame till the onions start turning brown.

Step 2 - Add the bell peppers and mix well. Cover with a lid for 5 - 6 mins stirring occasionally till the bell peppers are no longer totally raw. Add the salt, black pepper powder, cumin powder, red chilly powder and sugar. Mix well and cook covered till the bell peppers are almost done. We do not want the bell peppers to break down and mash. You should just be able to break them apart with your spoon effortlessly. Adjust taste. At this stage the whole preparation should be slightly stronger than what you desire. This is because, we are now going to add all the chickpea flour.

Step 3 - Lower the heat. Add the chickpea flour spoon by spoon and keep mixing, trying to avoid any lumps from being formed. Once all the chickpea flour is added, cover with a lid and let this cook for 2 to 3 mins, so the flour is no longer raw. 

Step 4 - This is an optional step. You can gently press all the preparation to the bottom of the pan and cook it for 5 more mins. on a low flame uncovered. This will give a slightly burnt texture to the vegetable, which according to me, makes it even more tasty.

Serve hot with some chapatis. It tastes great with some plain yogurt too. Hell I use it as a sandwich filling too. 

Did I mention this was one of my favorites??! :)

Tips:
In step 3, to be sure of avoiding lumps, you can sift the flour into the vegetable. But thats not compulsory. Personally I dont mind little lumps in this preparation. They taste really cool.

Once, you are done making this dish, make sure you dont cover it. Let it cool down completely and then cover this up. Covering this vegetable when it is hot or warm, makes it all soggy by the time it is ready to be eaten. And that is not a pleasant sight!

Thursday, December 16, 2010

Ambadichi Amti (Gongura curry)

Tired of the same spinach and fenugreek preparations, I wanted to start adding some different greens in our diet. That is when I came across a nameless maple leaf like green leafy vegetable in our grocery store.
But the problem was that I dint know what it was!
After a lot of high level discussions between my husband and me and trying to figure out on the iphone what this was..we finally decided to ask the owner about this vegetable.
He said.."Ye Gongura Hai!". Now that dint help us at all, as we dint ever hear of GONGURA*!
So we surfed online again and realised that this was called Ambadi in marathi. I was shocked! It was one of my absolute favorite greens and I dint know it looked anything like this before cooking!
I picked up a huge bunch and we headed home.

The story doesnt end here. I still had to be sure before I started wasting time and ingredients on this preparation.
So now it was skype time!
I asked my mom to log onto skype and made sure I had the correct vegetable in my hand. Once that was confirmed, I moved on to finally cooking this green.

What would I do without technology! :)

Serves: 3 to 4 people
Level: Easy


Ingredients:
1 large bunch gongura leaves (ambadi), roughly chopped
1/2 cup raw peanuts
1/2 cup chana dal
3/4 tsp mustard seeds
Pinch of asafoetida
6-8 fenugreek seeds (methi seeds)
1/2 tsp turmeric powder
3 green chillies, finely chopped
1 tblsp chickpea flour (besan)
1 tblsp goda masala
1 tblsp jaggery
Salt to taste
Oil

Method:
Step 1 - In a small bowl, add the peanuts and chana dal and soak them completely in water for a minimum of 3 to 4 hrs. Overnight would be better. Pressure cook these for 2 whistles till they are cooked well. We do not want to mash them. 

Step 2 - In a large pot, heat 3 tblsp of oil. When the oil is hot, add the mustard seeds. Once they splutter, add the asafoetida, fenugreek seeds and green chillies. Saute for a few seconds. Add turmeric powder. Saute for a few more seconds and add the chopped gongura leaves. Cook this for a good 5 mins mixing continuously.

Step 3 - Once all the greens wilt and start oozing water, add the chickpea flour and mix well. Add the salt, boiled peanuts and chana dal from Step 1, goda masala and jaggery. Mix well. Add enough water to reach your desired consistency. Mix well and let this boil for 5 to 10 mins. uncovered.

Serve hot with hot chapatis or/and rice.

Tips:
You can use this same preparation method with colocasia leaves too. It would result in a really famous maharashtrian preparation called "Alu cha phatphata". You will come across this if you get a chance to attend a traditional maharashtrian wedding. Just make sure you remember one change. Unlike gongura leaves, colocasia leaves are not sour. So just add 1/2 to 3/4 tsp of tamarind concentrate to the recipe above.

*Gongura leaves: 
Source: http://www.natural-homeremedies.com/blog/health-benefits-of-red-sorrel-leaves/
Gongura leaves are also known as Red Sorrel, Ambadi and Pulicha Keerai in various parts of India. It comes in two varieties namely the green leaf and the red variety, the latter being more sour than the former. The leaves are bitter, mildly astringent and have an acidic taste.
The herbal leaves of gongura, have the health benefit of being very effective in relieving the symptoms of fever.  It helps to cool any inflammation and heat in the blood. Fresh leaves help to stimulate the stomach and to sharpen the appetite.  In addition it is the herb that helps to cool the liver.


Thursday, December 2, 2010

Jam Drop Cookies

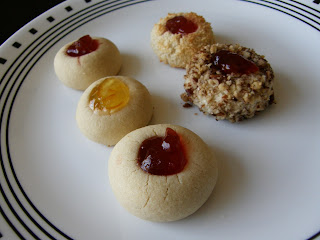
Tiny Beauties!

These tiny cookies, immediately impressed me. They looked so adorable that I had to try some right away. Making these are a total breeze! 

These cookies are also called Thumbprint Cookies. And that is because when you place them on a baking tray, you press your thumb in the center to make depressions, which are later filled with jam or jelly. The texture is more like the Indian Nankhatai or Shortbread cookies, but these arn't as sweet. The jam gives it the perfect sweetness. 

I made these cookies plump, because they look cuter! But you can make them slightly flat and then make a depression in them. Generally these cookies are baked with the jam IN them. But if you do this, make sure you finish these in a couple of days as the jam will slowly get the cookie soft, if not soggy. 
I bake jam drop cookies without any filling. I plop some jam just before serving and that according to me is perfect!

Heres how you make these. 

Serves: 16 cookies
Level: Easy


Ingredients:
1/2 cup unsalted butter, at room temperature
1/4 cup sugar
1 large egg, separated
1/2 tsp vanilla essence
1 cup plain flour
1/8 tsp salt
Jam for filling, any flavor
Crushed nuts to coat, optional
Crushed/Flaky coconut to coat, sweetened or plain, optional

Method:
Step 1 - Preheat oven at 350 Deg. F. Place some parchment paper on your baking sheet. If you don't have any on hand, spray some cooking oil on the tray.

Step 2 - Mix the flour and salt together. Keep aside.

Step 3 - In a large bowl, beat the butter and sugar till it forms a smooth paste. Preferably with an electric whisk. Add the egg yolk and vanilla essence. Beat well again till it all comes together. 

Step 4 - Slowly sift in the flour mixture from step 2. Keep beating till it starts to form a crumb-like mixture. Do not panic! Once the mixture resembles soft bread crumbs. Put the electric whisk away and knead the dough together with your hands. It should easily come together. Try rolling the dough into small rounds and place these on the lined baking tray from step 1.

Step 5 - To make coated jam drops, spread the nuts/coconut on a flat plate. Dip the cookies in egg white and immediately roll them into the nuts/coconut. Place them on the lined baking tray.

Step 6 - Press your thumb or the back of your wooden spoon into the cookie dough on the tray and form a deep depression or indentation. You don't want to go all the way through! We just need to make depressions for the jam to be poured in.

Step 7 - Bake in the preheated oven for 12-13 mins, or until the base of the cookie starts to brown. In case of the coated jam drop cookies, bake till the coconut/nuts start to brown. Make sure you don't burn these. Once done, turn the cookies onto a cooling rack and let them cool down. 

Pour in your favorite jam and serve!


Tips:
If in step 4, you find the dough too soft to roll into rounds, keep it in the refrigerator for 30 mins till the dough can be handled well.

For fillings, you can use any flavored jam. These cookies would taste good with nutella or peanut butter in them too. Get creative here!

Do not worry if you see the cookies form cracks in the oven. Trust me, they wont break and neither are these cookies too brittle to be served.

Happy Cooking Everyone!

Friday, November 26, 2010

Homemade Ghee (Clarified Butter)

With Diwali gone by, I am all out of ghee!

With a couple of friends interested in knowing how to make homemade ghee, this post is for all you girls out there. Yea...Finally!

Now I used to buy ghee from the Indian Grocery Stores. Most of us do! But from the time I realized that it is real easy to make some at home...I never went back. There is this distinct pure flavor to the ghee made at home, that I totally adore!

And as we dont use ghee a lot in our food, due to health reasons of course, one bottle goes a long long way!

So let's get started...

Serves: Makes 1 large bottle
Level: Easy


Ingredients:
2 lbs unsalted butter
1 tblsp water
Pinch of salt, optional

Method:
Step 1 - In a large pot, place the unsalted butter and turn on the heat to medium. Let the butter slowly melt down.

Step 2 - Once the butter melts, turn the heat to low and let it come to a boil. Do not stir the butter from the base at any time during the entire cooking process. During the boiling process, the milk solids settle at the base of the pot. We dont want them to again mix with the butter. Afterall, clarified butter is what we are looking for.

Step 3 - Once the butter boils for 10 mins, start lightly moving the foam away from the top of the butter to peep in. Our aim is to reach a good visual clarity. We should be able to see the bottom of the pan, with milk solids stuck to it. This is clarified butter (literally)!

Step 4 - Once the butter has reached a nice golden color and starts smelling like toffee/nutty, there will be a layer of foam on the top of this butter. At this point, take 1 tblsp of water and slowly pour this over the butter. Stand back when you do this. The foam starts popping and disappers. Now turn off the flame and let this mixture cool for around 20 to 30 mins. Do not let it completely cool down, as this will solidify the butter which then cannot be poured into a jar.

Step 5 - Strain the ghee into a clean and dry jar with a lid. I use a simple tea or coffee strainer to do this.

Step 6 - This is an optional step. If you prefer your ghee grainy, just add a pinch of salt to the ghee in your jar and stir well. By the time the ghee cools down, you will have a nice grainy clarified butter.

Done!


Tips:
Try and use an aluminium or steel or light colored pan to prepare ghee. If you use a dark pan, it is really difficult to see if the ghee has reached its desired golden color.

Use a slightly large pan, as when you add water to the butter, the foam rises a little to the top and you dont want it to be all messy on your counter top.

Use a really clean and dry jar to store ghee. This improves it's shelf life.

Happy cooking everyone!

Tuesday, November 23, 2010

Warm Apple Cake

A nice rainy night...sitting with blankets wrapped around you, watching a nice easy movie... enjoying the chill..:) It is at these times that we crave for some nice warm dessert..:)

When I checked the weather in the morning...I realised that such nights are going to be in fashion soon :) I saw some nice Granny Smith Apples lying in the fruit basket at home. Am not a big fan of apple pies....maybe because I dint try the best of those. So I decided to try something a little less sweet. After a lot of searching and browsing and reading...APPLE CAKE became almost a top priority for the day!

This apple cake is moist and a little dense. Tastes great with some cold vanilla ice-cream, drizzled with caramel or honey too.

A little more about baking apples...right below this recipe..:)

Level: Easy
Serves: 9 medium sized pieces


Ingredients:
2 cups chopped baking apples (I used Granny Smiths)
1.5 cups plain flour
1 tsp soda-bi-carbonate
1 cup sugar
1/2 cup oil
1 egg
3 tblsp milk (I used 2%)
1/2 tsp vanilla essence
1 inch cinnamon stick
3 - 4 cloves
Pinch of salt

Method:
Step 1 - Preheat oven to 350 Deg. F. Spray some oil in a 9 inch baking tray. Keep aside.

Step 2 - In a grinder, finely grind together the cinnamon stick and cloves.Sift together the plain flour, soda-bi-carbonate, cinnamon-clove powders and salt. Keep aside.

Step 3 - In a large bowl, beat together the oil, sugar and egg till it turns into a pale yellow color and you can no longer feel the rough sugar texture in the mixture. (Preferably use an electric whisk. Life would be simpler)

Step 4 - Add vanilla essence, milk and apples. Mix together with a wooden spoon or spatula till all of it comes together. Once it all comes together, quickly beat with an electric whisk for no more than a minute. We do not want to mash the apples in here. Just slightly break them down.

Step 5 - Pour the batter in the greased baking tray from step 1 and bake in the oven for 35 - 40 mins, till the top of the cake starts to crack and is a nice brown color. You need not insert a knife to check this cake, as if you poke the knife into a hot apple, you will end up with moist crumbs on the knife, which does not necessarily mean that the cake is uncooked or undercooked.

Let the cake cool down a little, then turn it out on a wire rack to cool further.

Serve warm.


Happy cooking everyone!

Tips:
You can avoid using spices in this cake and keep it plain vanilla if you prefer.

Almost any apple can be enjoyed when eaten fresh. However, not all apples are ideal for the kitchen.

The best baking apples offer a balance of sweet and tart flavors as well as flesh that doesn't break down in the oven.

Apples that can be fearlessly used for baking would be Cortland, Granny Smith, Jonagold, Jonathan, McIntosh, Newton Pippin, Rhode Island Greening, Rome Beauty and Winesap.

Hope this helps!

Friday, November 19, 2010

Spice Rubbed Salmon

It's Official! Am in love with Salmon....

After my first attempt at Salmon, which was a total hit (Masala Baked Salmon)...I decided to invest some more time into finding interesting Salmon recipes....and there were sooooo many! It is always exciting to see different flavors being used in different parts of the world and how different combinations can result in mind-blowing outcomes!

Let me share this really different recipe, which I came across on the cooking channel. The finished dish involves a spicy, crusty and crunchy salmon coating which when cut into, gives way to a juicy, soft salmon!..Heaven!

Here is what you need...

Serves: 1 or 2 people
Level: Easy


Ingredients:
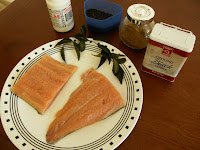
0.5 lb salmon fillet (preferably wild caught with skin on)
15 - 20 curry leaves
1 tblsp mustard seeds
0.5 tsp asafoetida
2 tsp garam masala
Salt to taste

Method:
Step 1 - Wash the salmon fillet thoroughly and wipe them dry. Apply salt to the fillet and let them sit aside for a few minutes. Wipe the curry leaves and lay them over a tissue paper to dry off. We do not want to use wet curry leaves for this recipe, as we need to make a dry spice rub.

Step 2 - In a small blender bowl, grind together the curry leaves, mustard seeds, asafoetida and garam masala. Grind it to a coarse powder. Make sure you try to keep the ingredients as dry as possible. You dont want to end up with a paste here.

Step 3 - Apply the rub from step 2 to the salmon fillet and gently press it down, so it form a nice coat over the salmon. Make sure you cover both sides.

Step 4 - Heat a pan on medium heat. When it is hot, spray some cooking oil and gently place the salmon fillet over it. Start off with first placing the skin side down on the pan. Let it cook without moving it around for 3 mins. Spray some more oil on the top of the fillet. Then flip the salmon gently with tongs. The salmon is fragile at this stage. You dont want to break the pieces apart. So be as gentle as possible. Then let the salmon cook for another 3 to 4 mins on the other side. At any stage you think the salmon is burning or looks real dry, spray some oil on it. You might need to spray the oil a couple of times especially if you dont have a good non-stick pan. Remove off the pan when the salmon gets to a nice pink color and the crust of the fish is deep dark brown in color.

Serve hot with a gentle squeeze of lime.


You could always bake salmon to make it even more healthier. But for this particular recipe, I am not too sure if the salmon would taste as good, if it dint have a crusty covering..
Never the less, if you do bake it, don't forget to let me know how it turns out...:)

Happy cooking everyone!

How to know if salmon is cooked?
Try lightly poking it with a knife. The knife should slide in without any efforts, if the salmon is cooked well.
The salmon also changes to a nice pink color.
It also oozes out a white substance as it starts cooking. Make sure you see that, especially if you want to have the salmon well-done!

Health benefits of salmon? (Source: Internet)
Salmon is very nutritious. It is high in protein and the "good fats". It has a lot of omega-3 fatty acids.
Did you know that a 4 oz serving of wild salmon provides a full day's requirement of vitamin D? It is one of the few foods that can make that claim. That same piece of fish contains over half of the necessary B12, niacin and selenium and is an excellent source of B6 and magnesium.

Omega-3 fats seem to primarily work through reducing inflammation in our bodies. Inflammation is turning out to be at the base of many health problems, including heart disease, diabetes, some types of cancers and arthritis. Omega-3 also helps prevent the blood clots which cause many strokes.

Tuesday, October 26, 2010

Masala Baked Salmon

Salmon it is!

After reading a lot about the health benefits of fish, I started reading all about the techniques of baking or steaming or grilling fish. It amazed me, when I realized that it was really easy to bake fish. This had to be tried!
After tasting a variety of fishes, I finally decided on trying some salmon. It has a great taste by itself. How wrong could you go with this! 

Not being very creative with fish, I always made the typical and safe shrimp and pompano Indian recipes. Did not get myself involved with "foreign" fish..:). 

But now that my Salmon Experiment was a hit, be sure to see a lot of healthy baked fish recipes on Bakasoor...

Hope everyone enjoys my Indian take on Salmon...


Serves: 2 to 3 people
Level: Easy


Ingredients:
1 large salmon fillet
1 tsp salt or to taste
1 tsp tandoori chicken masala
1/2 tsp garam masala powder
1/2 tsp red chilly powder
1/2 tsp turmeric powder
1/4 tsp tamarind concentrate
1 tsp ginger garlic paste
2 tsp extra virgin olive oil
Juice of half a lemon
2 tblsp chopped onions
4 thin slices lime/lemon
Chopped coriander for garnishing
Chaat masala for garnishing (optional)

Method:
Step 1 - In a small bowl, mix together the salt, tandoori chicken masala, garam masala, red chilly powder, turmeric powder, tamarind concentrate, ginger garlic paste, olive oil and the juice of half a lemon. 

Step 2 - Apply the marinade from step 1 liberally all over the salmon. Keep refrigerated for at least an hour. This helps the marinade settle in well.

Step 3 - Place a large foil on a baking sheet or pan. The size of the foil should exceed the size of the pan. Place the marinated salmon on the foiled baking sheet. Sprinkle some chopped onions, coriander leaves and lemon slices on the fish. Wrap the fish with the foil really well. Do not allow any pockets to form that might let the steam escape. You want the salmon to cook in its own juices. More like, steaming in its own juices.

Step 4 - Place the baking sheet in a 425 deg F. preheated oven for no more than 15 mins. 

Serve hot, sprinkled with some more fresh coriander and chaat masala for that extra kick.


Enjoy!


Tips:
Always get the wild caught salmon and not the farm raised. Its tastier and healthier.

How to know if salmon is cooked?
Try lightly poking it with a knife. The knife should slide in without any efforts, if the salmon is cooked well.
The salmon also changes to a nice light pink color. 
It also oozes out a white substance as it starts cooking. Make sure you see that, especially if you want to have the salmon well-done!

Health benefits of salmon? (Source: Internet)
Salmon is very nutritious. Its is high in protein and the "good fats". It has a lot of omega-3 fatty acids.
Did you know that a 4 oz serving of wild salmon provides a full day's requirement of vitamin D? It is one of the few foods that can make that claim. That same piece of fish contains over half of the necessary B12, niacin and selenium and is an excellent source of B6 and magnesium. 
Omega-3 fats seem to primarily work through reducing inflammation in our bodies. Inflammation is turning out to be at the base of many health problems, including heart disease, diabetes, some types of cancers and arthritis. Omega-3 also helps prevent the blood clots which cause many strokes.


Thursday, August 19, 2010

Chicken Cafreal

NAILED IT!

That is exactly what I said when I first tried and tested this recipe. Trust me...dont miss this one! You could make it in a pan or even grill it..whatever suits you best. I personally prefer the pan, as I thought my grilled pieces turned out slightly dry. Maybe with some basting along the way, it could have ended up juicy and succulent too.

It is said that the preparation of Cafreal originated from the Portuguese colonies in the African continent. It was introduced into the Goan cuisine by the Portuguese. It has an appetizing green color to it, which makes this dish visually appealing. The tastes are a combination of spicy...with a hint of sweet. Its just heavenly.

I first had this preparation when I was a kid at "Florentine" in Saligao, Goa (real close to Calungute beach). Inspite of being in Goa, this dish is a bigger hit in this restaurant that any of their fish preparation. Amazing isint it?! If you do end up visiting this, make sure you also try their Xacutis and Vindaloos. But believe it or not...nothing beats thier Cafreal!

I refreshed my memories of this dish when I visited "The Mynt" in San Jose. Just amazing Chicken Cafreal. They served it with some rice though....which I am not a big fan of!

Lets get to making some now...


Level: Easy
Serves: 4 people

Ingredients:
750 gms chicken
2.5 cups coriander leaves, loosely packed
6-8 green chillies, roughly chopped
2 inch ginger, roughly chopped
15 garlic flakes, roughly chopped
1 tblsp poppy seeds (khus khus)
1 inch cinnamon stick
6-8 peppercorns
1 tsp cumin seeds
1/2 tsp turmeric powder
5-6 cloves
1.5 tsp ginger garlic paste
1.5 tsp honey
Juice of half a lemon
Salt to taste

Method:
Step 1 - Clean and wipe dry the chicken slices. Rub them well with the ginger garlic paste and salt and keep aside.

Step 2 - In a grinder, grind together the coriander leaves, green chillies, ginger, garlic, poppy seeds, cinnamon stick, peppercorns, cumin seeds, turmeric powder and cloves. Use very little water to grind this together into a paste.

Step 3 - Apply this paste from step 2 to the chicken from step 1. Rub well together. Keep covered in the refrigerator for 1 - 2 hrs. You could keep it overnight too, but I did not personally notice any significant difference in taste.

Step 4 - Heat some oil in a pan. When hot, add in the chicken along with all the spice paste. Let them cook covered for some time on medium high heat. Once the chicken is cooked, cook uncovered till the gravy gets dry and clings onto the chicken. Make sure it does not burn at this stage. Once all done, pour some honey and the lemon juice. Mix well and serve hot.

Serve this with some mashed potatoes or fries or with some steamed vegetables. Its just perfect!


This recipe is inspired from http://www.goanfoodrecipes.com/search/label/Chicken%20Cafreal. I have made some personal changes to this recipe, but if you would like to know the original source...Here it is!

I have not specifically mentioned the shape and size of the chicken pieces as anything would do. You could use this on tiny pieces or drumsticks ...bone in or bone out. Works well anyway. So use what you prefer.

The original recipe calls for some tamarind pulp instead of lemon juice. But I did not want to use the store bought tamarind pulp here, so I replaced it with some lemon juice.

Thursday, July 29, 2010

Paneer 65


A hyderabadi starter dish with a mystery! Now why the number 65? Lots of theories to this, some say it was originally cooked with 65 ingredients or spices, some say it was first made in 1965 and some others say it was the 65th item on a mess menu...and so on...I say...I JUST DONT CARE! Whatever was created...was just wonderful!

This dish makes a great starter and jazzes up a party menu. You can keep it all in one dish, or just poke some toothpicks in each piece and decorate it. The spice paste so wonderfully clings onto the paneer, that each bite tastes awesomely full of flavor!


Level: Medium
Serves: 6 people

Ingredients:
Paneer marination:
200 gms paneer, cut into medium sized cubes
1 egg
2 tblsp all purpose flour
2 tblsp cornstarch/cornflour
1 tblsp chinese chilly sauce
1 tblsp soya sauce
Salt to taste
1/2 tsp black pepper powder
1 tsp sugar
Water as required

Sauce:
1/2 tsp mustard seeds
20 curry leaves
1 tblsp garlic, finely chopped
1/2 tblsp ginger, finely chopped
1 tsp chilly powder
1/2 cup yogurt, well beaten
1 tsp chinese chilly sauce
1 tsp tomato ketchup
Salt to taste
1/4 tsp pepper
1 tsp cornflour (made into a paste with 2 tblsp water)
Coriander to decorate

Method:
Lets start with the paneer - 
Step 1 - In a bowl, add the all purpose flour, cornflour, chilly sauce, soya sauce, salt, pepper, sugar and mix well. Add water gradually till it forms a semi-thick batter. The batter consistency should be such that it should coat the back of your spoon evenly. It should not run off the spoon quickly.

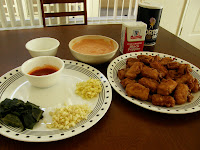
Step 2 - Add the cubed paneer pieces. Mix well and deep fry till it reaches a nice brown color, as seen in the picture. Keep aside.

Lets work on the sauce now - 
Step 1 - Heat a tblsp of oil in a pan. Add the mustard seeds and let them splutter. Add the curry leaves, ginger and garlic. Stir fry for a min.

Step 2 - Add the red chilly powder and yogurt. Mix vigorously. Immediately add the chilly sauce, tomato ketchup, salt and pepper. Give it a quick mix. Drop in the paneer pieces and mix well so that the sauce coats all the paneer pieces well.

Step 3 - Finally add in the cornflour paste and mix well. This should immediately thicken the sauce and the sauce will cling on well to the paneer.

Serve hot decorated with freshly chopped coriander leaves.


Tips:
The sauce needs to be made very quickly. So have all the ingredients measured and kept at hand, else you could end up curdling the yogurt!

Do not skip the egg in the paneer marination. It helps in uniform coating over the paneer pieces when they are frying.

I have shared the recipe I learnt in a cooking course I took with my friends in college. But for a healthier version, you could always replace paneer with extra firm tofu or just avoid the frying process. But if you avoid the frying process, make sure your sauce has stronger flavors, cause the paneer is going to be tasteless in this case.

Also, Paneer 65 is supposed to have a bright red color...if you want it that way, go ahead and add some food color in your yogurt!


Happy cooking everyone!

Friday, July 23, 2010

Chicken Chettinad

Now this is a really convenient and healthy chicken dish for all of you. No coconut, not too much oil. Perfect for those health conscious guests. This dish is made from ingredients that are easily available at home. So it can be made even when you have unexpected guests coming over.

This dish is essentially a semi-gravy dish...if thats a word! Do not try and make it into a gravy dish by adding water, as it looses a lot of its taste. Have been told that if you add a can of coconut milk this turns into a nice gravy dish. A great idea, but then, doesnt make sense if you want to keep it healthy. You could try fat free coconut milk....but well, lets keep that for some other time!

Chettinad cuisine is the cuisine of the Chettinad region of theTamil nadu state in South India. It is known to be one of the spiciest and most aromatic cuisine in India. 

Now that you are enlightened enough, lets get to making this dish now...:)


Serves: 4 people
Level: Easy

Ingredients:
750 gms boneless chicken, cut into bite size pieces
1 tsp mustard seeds
1.5 tsp cumin seeds
2 inch cinnamon sticks
4 black peppercorns
3 green cardamoms
4 - 5 cloves
2 bay leaves
1 tsp ginger garlic paste
1 large onion, finely chopped
2 tomatoes, finely chopped
3 green chillies, finely chopped
15 curry leaves
2 tsp coriander powder
1/2 tsp turmeric powder
1 tsp red chilly powder
1 tsp cumin powder
1 tsp black pepper powder
Salt to taste
Coriander to decorate

Method:
Step 1 : Heat oil in a pan. When hot, add the cinnamon sticks, cloves, black peppercorns, bay leaves and green cardamoms. Immediately add the mustard seeds. When they splutter, add the cumin seeds and saute for a few seconds till they turn brown.

Step 2 : Add turmeric powder. Stir for a few seconds and add the onion. Do not let the turmeric turn brown. Saute the onions till they turn brown. Add the ginger garlic paste, green chillies and curry leaves. Stir well, till the ginger garlic paste looses its raw smell. Add tomatoes, red chilly powder, coriander powder and cumin powder. Stir well. Cook till the tomatoes are completely broken down and cooked and oil starts to leave the mixture.

Step 3 : Add the cut chicken and mix well for 5 mins. Cover and cook for 8 - 10 mins or till the chicken is cooked. Stir occasionally. Add 3/4 cup of water just in case the dish seems too dry. You do not want to make it runny. Just a thick gravy. Add black pepper powder and mix everything once. Decorate it with coriander leaves.

Serve hot, with any bread or with rice.


Tips:
This is a fairly spicy dish. If you want to make it less spicy, eliminate the black peppercorns in the oil, reduce the amount of green chillies or just avoid them, as we are adding red chilly powder ahead and reduce the quantity of black pepper powder sprinkling in the end. 

If you think its really very spicy once its done, well add some coconut milk to get milder flavors..:).

Enjoy!


Saturday, July 3, 2010

Banana Nut Muffins (perfectly moist)

Banana nut muffins have always been my favorite. Actually anything with bananas will do. Unfortunately most of the banana recipes call for over-ripe bananas. Well, bananas dont stay that long at my place. So this time when I purchased a couple, I wrapped them in plastic and stuffed them in the refrigerator way beyond my reach and the plan worked. Had over ripe bananas ready for these gorgeous muffins.

Walnuts taste the best in these muffins. But I was out of walnuts. Had only cashews and almonds at home. My husband is in love with cashews and I cant eat more than a couple! So I did not add any nuts in the batter, just poked a few in individual muffin cups. Customized banana nut muffins you could say!

Would like to mention one important tip here. To make sure these muffins are really perfectly moist, you cannot overwork the batter. Thats the key. Excessive beating will lead to dry muffins and thats not what we aim to do. So do follow the instructions below. They are quite fail-proof if you stick by them.

Lets get to making some muffins now...


Level: Medium
Serves: Makes 12 muffins

Ingredients:
150 gms all purpose flour
1 tsp soda-bi-carbonate
1 tsp baking powder
1/4 tsp salt
3/4 cup sugar
2 eggs, well beaten
1/2 cup unsalted butter, at room temperature
2 bananas, mashed
1/2 cup walnuts, roughly chopped
2.5 tblsp milk
1/2 tsp vanilla essence

Method:
Step 1 - Sift the flour, soda-bi-carbonate, baking powder and salt together in a large bowl. Keep it aside. Grease your muffin or cake tin with butter spray or butter lightly. Keep aside.

Step 2 - In a mixing bowl, beat together the butter and sugar till it gets a pale yellow color. Would recommend using an electric whisk here.

Step 3 - Add the beaten eggs, little at a time and beat continuously till they are incorporated well.

Step 4 - Add the vanilla, milk and mashed bananas. You will need to do a taste test here. At this point, you need the batter to be sweeter than what you generally prefer. This is because you will be adding a lot of flour next, which would anyway reduce the sweetness. If the bananas dint turn out to be sweet, you might have to add 1/4 to 1/2 cup of sugar. I had to do that. 

Step 5 - Add the sifted flour. Mix it well with a wooden spoon or a spatula. Do not use the electric whisk here. Lightly mix it till you can no longer see any lose flour in your mixing bowl. Thats it. Do not over mix here.

Step 6 - Spoon or pipe the batter into muffin tins, until they are 3/4th full. Bake in a preheated 350 Deg F. oven for 30 mins or till the tops are golden brown.


Serve these at breakfast, with some honey or maple syrup along with some hot fresh coffee 
or you could warm these up in a microwave and serve it with some cold ice cream for desserts!..Absolutely Delicious!

Tips:
You could use salted butter if you have it at home, to replace the unsalted butter. Just make sure you reduce the proportion of salt you add to half.

Do not panic if the muffins look like they would spill over in the oven. They dont, if you dont fill them more than 3/4th of the way. They will settle down once they are out of the oven cooling. 

Enjoy!


Tuesday, June 22, 2010

Super quick pizza sauce (no cooking)

This is a really cool, super quick pizza sauce recipe, that I came across in www.allrecipes.com. All it mainly requires is tomato paste, oregano and olive oil. These are things that we might have in our pantry if we cook Italian food at home.

The recipe mentions, that this sauce can be used as marinara over pasta..but I personally think it wouldnt hit the mark, on pasta. You need fresh tomatoes for a good marinara sauce. Tinned stuff dont quite make it there. But of course, if you fall in love with this sauce, go ahead..pour over some pasta and have a good time.

Here's how it is made..

Level: Easy
Serves: Makes almost 3 cups of sauce

Ingredients:
1 can tomato paste (6 ounces)
1.5 to 2 cups water
1/3 cup olive oil
4 to 5 cloves of garlic, grated
Salt to taste
2 tsp ground black pepper
1.5 tsp oregano

Method:
Step 1 - In a bowl, add the tomato paste, olive oil and water. Mix well till all the liquids combine well.

Step 2 - Add the salt, pepper, oregano and garlic. Mix well. 

Done.


Real easy right? 

In the picture above, I have smeared this sauce over some sliced english muffins. Have topped it with onions, bell peppers, corn and of course some cheese. Baked in a 350 Deg. F. oven for 13 - 15 mins or till the base looks crusty on the sides. Makes a great appetizer for a party.

Enjoy!

Tips:
You can adjust the quantity of garlic as per your liking. 

Any kind of dried italian herbs would work in this recipe. I had oregano at home and so I used it. If you have rosemary or basil or even assorted just add it in. It may change the flavor a bit, but will still be yum!


Thursday, June 17, 2010

Leftovers Tips - Crescent Braid

OK I'LL SAY IT!!!

DOUGH HATES ME!! there is something between us, we just cant work together. Readymade or not! Its a curse!!
:)

Hence, my pictures here are not so good...but trust me yours will be better.

My husband braids this dough way better than I do...but he insists I keep trying and conveniently dint help me this time!!!

Am writing this post, just to let you know, what you can do with those leftover dry veggies, the next day.
This easily becomes a great breakfast dish. Filling and of course FANCY!. Sure to impress all !

And its so quick and easy, it will make you happy to know how effortlessly you can create beauties like these.


Level: Easy
Serves: 2 to 3 people

Ingredients:
1.5 - 2 cups leftover veggies
Spread any kind - I used green chutney
Cheese (optional) any kind
1 packet pillsbury crescent rolls dough

Method:
Step 1 - Cover a baking tray with wax paper. Roll out the dough on the tray and seal up the seams to turn it into one long sheet.

Step 2 - Smear the center of the sheet with green chutney. Place the veggies over it.

Step 3 - As seen in the picture, cut the dough with a knife into half strips. Go only till 1/2 inch away from the veggies. Do this on both the sides.

Step 4 - Fold these strips on top of each other and make a nice braid.

Step 5 - Bake in a 350 Deg oven for 10 - 13 mins or till it gets a lovely golden color on it.

Serve hot with some fresh orange juice.


Breakfast is ready!

Enjoy!